How to render a house exterior in Sketchup?
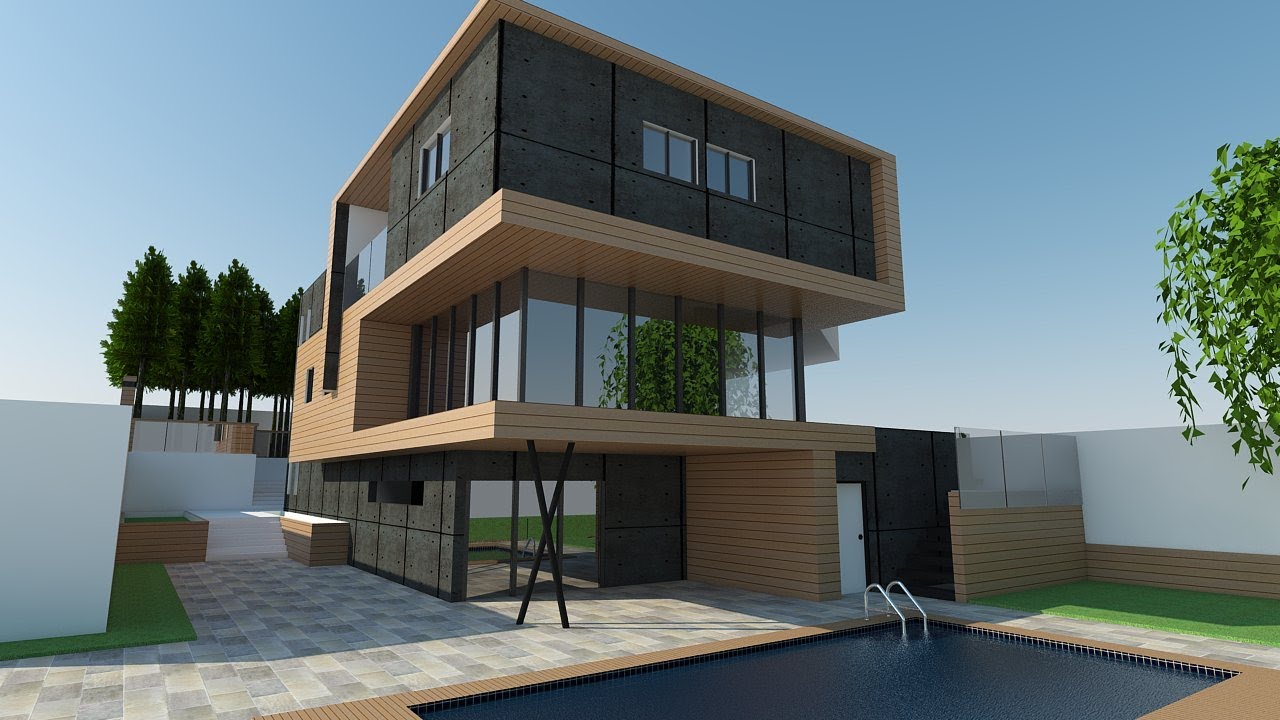
Before you begin, you need a model in SketchUp that is Render Ready. While it is possible to render a house in Photoshop or 2D in SketchUp, it is much more realistic to model a house in 3D because it allows you to create more realistic shadows and depth. The additional benefit of modeling in 3D is that you can capture a house from many different angles to create an accurate image.
Dome light
If you want to produce realistic looking shadows on your rendered images, you can use a specialized lighting tool, called a Dome light. A Dome light is an additional light source that uses an HDRI map instead of a direct light source. It is useful for rendering exterior views of houses because the effect of light is smooth and accentuates the beauty of a home. However, it requires more work than a regular light source.
To use this light, simply double click on it to enter the editing mode. Then click on the red squares to change the size of the area light. Rotate the light source using the native SketchUp tools. You can also adjust its angle by clicking on the magenta square. To use this light in SketchUp, you must have the Render Plus software installed. This tool is also available for importing and modifying 3D models.
The Dome light is easy to integrate in your workflow. After placing it, you can easily edit the light. To do this, simply double-click on the geometry to view the light beam. After editing, press the ESC key to cancel the editing mode and return the light source to its original setting. Remember, that in SketchUp, there are Undo and Redo buttons that will allow you to undo any changes you make.
Another free tool is V-Ray. You can download it for free or try the demo version for 30 days. It gives you an overview of how to use different types of V-Ray lights, and includes various assets for you to download and install. This tool is also useful for interior rendering, as it builds on the concepts of exterior lighting. So, you can see how the two tools work together to produce realistic results.
Material qualities
When designing the exterior of a house, you may want to customize the material qualities of the house using the Sketchup software. However, this program only allows you to change the materials for the stone siding and roof shingles. You will not be able to change any other exterior elements, including doors, side windows, or landscaping. Nevertheless, these options can be very helpful when creating realistic renderings. Read on for more information.
Lighting workflow
A proper Lighting workflow for house exterior rendering in Sketchup starts with accurate placement of light sources. Once placed, you can edit them with the help of the editing tools. To edit a light source, double-click the geometry to bring up its aids. To undo the edits, press the ESC key or cancel. If you make a mistake, you can always use the Undo and Redo functions of SketchUp. All changes made in SketchUp will be carried over to Enscape.
Lighting is critical for achieving realistic scenes, which convey a feeling. However, not all light sources are created equal. This leaves many SketchUp users in the dark about how to configure their lights effectively. To overcome this problem, this article will provide a comprehensive overview of various types of light sources and provide best practices for configuring them in SketchUp. Once you’re done with the basics, read on for some additional tips.
You can also color lights in SketchUp by choosing the paint bucket tool. To color a light, click on its assigned layer or component and choose a color from the Materials tray. Light sources can be placed together or individually in groups if you’d like. In the same way, you can use a mask for each light source. Once you’re done with the lighting, you can export your render.
Another tip for lighting a house exterior in Sketchup is to use V-Ray software. The free trial version of the software includes a video guide. In it, you’ll learn how to set up a nighttime exterior render. Learn how to use a variety of V-Ray lights. After you’ve mastered exterior lighting, you can move on to interior lighting. This video also covers how to setup interior lighting in Sketchup.
Importing V-Ray proxy models
To import V-Ray proxy models for use in sketchup, click on the File menu and select Open. Select the V-Ray Proxy mesh option. It will import geometry from an external mesh at render time, without taking up any SketchUp resources. This feature makes it possible to render large scenes, with millions of triangles, which SketchUp is simply not equipped to handle. To export the mesh, click the V-Ray Object Toolbar icon or the Extensions menu. Once you’ve selected a mesh, click on the V-Ray icon.
Once imported, you can choose a viewport preview mode, which will be displayed in the preview. You can either use the “Partial Mesh” preview to see only a part of the model, or the “Whole Mesh” preview to see the entire model. The “Whole Mesh” preview will display the entire model, while “Bounding Box” will display only the mesh outline. You can also choose to import V-Ray proxies into Sketchup by clicking the “Custom” icon in the Viewport Preferences dialog box.
Using the Proxy Models option is an excellent way to render exteriors. There are several reasons why the process is so important. Proper placement of small details is essential in achieving a high quality rendering. For example, if you want to make the garage opening body look like a single, simple piece of metal, you should add the V-Ray Proxy model to Sketchup to make it more realistic.
If you’ve got a house model that includes many different V-Ray Proxy models, you can import them into Sketchup and preview the result. With SketchUp’s Adaptive Lights, you can save up to seven times on the rendering process! Using the sun animation feature in SketchUp lets you import V-Ray scenes from other applications, such as Adobe Photoshop and Autodesk 3D. You can also import pre-animated 3D objects as Animated V-Ray proxies, and preview the result.
Positioning the camera at a more natural eye altitude
If you’re planning on using SketchUp to create an architectural rendering, you’ll want to position the camera at a more natural eye height. This is achieved by using the Look Around tool or by changing the camera settings. Typically, architects use two-time perspective, which makes vertical fronts appear horizontal. Turn two-time perspective on in the camera menu.